
This tutorial was written by me on May 5th, 2014. Any resemblance to
any other tutorial is pure coincidence. Please DO NOT claim this
tutorial as your own or post it to any other blog or website without
permission from me. It was written for PSP X, but should be compatible
with any version of PSP. I wrote it assuming that you have a working
knowledge of PSP and it's components.
SUPPLIES:
Plug-in used
Eye Candy 4000 Gradient Glow For Name (Optional)
Plug-in used
Eye Candy 4000 Gradient Glow For Name (Optional)
Xero porcelain
Xero Filters - Illustrator
Penta Filters - VTR2
Penta Filters - VTR2
Brush Strokes – Crosshatch
I used the artwork of Elias Chatzoudis You have to be licensed to use this
artwork and it can be purchased Now he has been at PTE but with them
closing August 1, 2012 but you can buy his tube at his site here
*Scrapkit Of Choice*
I am using the Awesome PTU kit "
You can find the tutorial Here
Hope you enjoy!
Some Beach - Tagger" by HonoredScraps
And can be purchased ~ HERE
Thank you Patty for making such wonderful kits to create with :)
And Check Her other Kits HERE
♥
Let Start Open up 700x700 Blank Canvas.
1.Click on your Frame1 background select all float defloat Open up your Beach Image Copy and paste as new layer Invert delete,
Apply Xero Filters - Illustrator with the following settings below,
Change the blend mode of the layer to Multiply. Highlight the bottom photo layer and ,
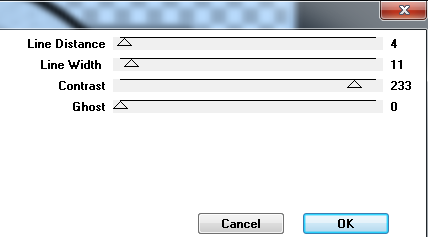
apply Penta Filters - VTR2 with the following settings below,
Apply DropShadow Vertical & Horizontal:-0, Opacity 50, Blur 5, Shadow on new layer - unchecked .
Apply Xero Filters - Illustrator with the following settings below,
Change the blend mode of the layer to Multiply. Highlight the bottom photo layer and ,
apply Penta Filters - VTR2 with the following settings below,
Apply DropShadow Vertical & Horizontal:-0, Opacity 50, Blur 5, Shadow on new layer - unchecked .

2.Click on your Frame2 background select all float defloat Open up your Beach Image Copy and paste as new layer Invert delete,
Apply Xero Filters - Illustrator with the following settings before,
Change the blend mode of the layer to Multiply. Highlight the bottom photo layer and ,
apply Penta Filters - VTR2 with the following settings before,
Apply DropShadow Vertical & Horizontal:-0, Opacity 50, Blur 5, Shadow on new layer - unchecked .
3.Open up your Element_55 copy and paste as new layer Go to your Rectangle select all float defloat Invert delete,
Duplicates Image Mirror,Apply DropShadow Vertical & Horizontal:-0, Opacity 50, Blur 5, Shadow on new layer - unchecked .
4.Click on your Frame 1 Select all float defloat Open up your Paper_13 copy and paste as new layer invert delete,
Apply Effects- plugin filters- AAA textures with those settings below,PhotoEffex Scanlines
with setting,below Apply Bevel with setting Below,Apply DropShadow Vertical & Horizontal:-0, Opacity 50, Blur 5, Shadow on new layer - unchecked .


5.Click on your Frame 2 Select all float defloat Open up your Paper_13 copy and paste as new layer invert delete,
Apply Effects- plugin filters- AAA textures with those settings before,PhotoEffex Scanlines
with setting,before Apply Bevel with setting before,Apply DropShadow Vertical & Horizontal:-0, Opacity 50, Blur 5, Shadow on new layer - unchecked .
6.Click on your rectangle select all float defloat Open up your Paper_06 copy and paste as new layer invert delete,
Apply Brush Strokes – Crosshatch with setting below,

7.Open up your Element_76 copy and paste as new layer resize 60%,Duplicates Image Mirror,Apply DropShadow Vertical & Horizontal:-0, Opacity 50, Blur 5, Shadow on new layer - unchecked .
8.Open up your Element_58 copy and paste as new layer resize 60%,Apply DropShadow Vertical & Horizontal:-0, Opacity 50, Blur 5, Shadow on new layer - unchecked .
10.Open up your Element_21 copy and paste as new layer resize 60%x2,Apply DropShadow Vertical & Horizontal:-0, Opacity 50, Blur 5, Shadow on new layer - unchecked .
11.Open up your Element_79 copy and paste as new layer resize 60%x2,Apply DropShadow Vertical & Horizontal:-0, Opacity 50, Blur 5, Shadow on new layer - unchecked .
13.Open up your Element_02 copy and paste as new layer resize 60%x2,Apply DropShadow Vertical & Horizontal:-0, Opacity 50, Blur 5, Shadow on new layer - unchecked .
14.Open up your Element_58 copy and paste as new layer resize 60%,Apply DropShadow Vertical & Horizontal:-0, Opacity 50, Blur 5, Shadow on new layer - unchecked .
15.Open up your Element_42 copy and paste as new layer resize 60%x2,Apply DropShadow Vertical & Horizontal:-0, Opacity 50, Blur 5, Shadow on new layer - unchecked .
16.Open up your Element_72 copy and paste as new layer resize 60%x2,Apply DropShadow Vertical & Horizontal:-0, Opacity 50, Blur 5, Shadow on new layer - unchecked .
17.Open up your Element_05 copy and paste as new layer resize 60%x2,Apply DropShadow Vertical & Horizontal:-0, Opacity 50, Blur 5, Shadow on new layer - unchecked .
Add the name and copyright info
No comments:
Post a Comment